Developing a dApp with WAGMI and RainbowKit
In this guide, we'll leverage Next.js, WAGMI, and RainbowKit to create a user-friendly dApp that interacts with the NFT smart contract we deployed on Soneium Minato earlier. With this setup, you'll enable users to connect their wallets, mint NFTs, and view their NFT balances directly from a sleek frontend.
Prerequisites
Ensure you have the following installed:
- Node.js
- pnpm (optional, but recommended)
Example Code Repository
You can find the example code we used for this tutorial here.
Step 1: Create a Hardhat Project
To kickstart your Next.js project, follow these steps:
-
Initialize a Next.js project:
$ npx create-next-app@latest nft-app

✔ Would you like to use TypeScript? … No / Yes
✔ Would you like to use ESLint? … No / Yes
✔ Would you like to use Tailwind CSS? … No / Yes
✔ Would you like to use `src/` directory? … No / Yes
✔ Would you like to use App Router? (recommended) … No / Yes
✔ Would you like to customize the default import alias (@/*)? … No / Yes -
Open the project directory: Navigate to the project directory and remove the
package-lock.jsonfile, as we will usepnpmfor package management.$ cd ./nft-app/
$ rm package-lock.json -
Install dependencies:
$ pnpm i @rainbow-me/rainbowkit wagmi viem@2.x @tanstack/react-query -
Start the development server: Launch your Next.js app locally:
$ pnpm dev
Step 2: Add Reown (WalletConnect) project ID
As every dApp that relies on WalletConnect, RainbowKit needs to obtain a projectId from Reown Cloud (previously known as WalletConnect Cloud). Sign up for free and get your ID:
NEXT_PUBLIC_REOWN_PROJECT = "YOUR_PROJECT_ID"
Step 3: Create WAGMI's config file
Let’s configure WAGMI for seamless interaction with the blockchain:
- Create
modulesfolder withinsrcfolder. - Create
wagmifolder inside themodulesfolder. - Add a
config.tsfile within thewagmifolder.
- (Optional) Download the Soneium logo file
symbol-full-color.svgfrom here. - (Optional) Create
publicfolder under the root folder and add the logo file.
Folder Structure
📁public
└── symbol-full-color.svg
📁src
└── 📁app
└── 📁modules
    └── 📁wagmi
        └── config.ts
import { getDefaultConfig } from "@rainbow-me/rainbowkit";
import { sepolia, soneiumMinato } from "viem/chains";

const reownProjectId = process.env.NEXT_PUBLIC_REOWN_PROJECT;

const minato = {
  ...soneiumMinato,
  name: "Soneium Minato",
  iconUrl: "/symbol-full-color.svg",
};

export const WAGMI_CONFIG = getDefaultConfig({
  appName: "YOUR_DAPP_NAME",
  projectId: reownProjectId as string,
  chains: [minato, sepolia],
  ssr: true,
});
You can add more than one chain if your dApp supports multiple chains.
export const WAGMI_CONFIG = getDefaultConfig({
  appName: "YOUR_DAPP_NAME",
  projectId: reownProjectId as string,
  chains: [minato, sepolia],
  ssr: true,
});
Step 4: Create a Wallet Provider Wrapper
We’ll create a wrapper that integrates WAGMI, QueryClient, and RainbowKit providers.
- Create
componentsfolder under thewagmifolder. - Add
WalletProvider.tsxfile inside thecomponentsfolder.
Folder Structure
📁src
└── 📁app
└── 📁modules
    └── 📁wagmi
        └── 📁components
            └── WalletProvider.tsx
"use client";

import { WAGMI_CONFIG } from "@/modules/wagmi/config";
import { RainbowKitProvider } from "@rainbow-me/rainbowkit";
import { QueryClient, QueryClientProvider } from "@tanstack/react-query";
import { soneiumMinato } from "viem/chains";
import { WagmiProvider } from "wagmi";

const client = new QueryClient();

export function WalletProvider({
  children,
}: React.PropsWithChildren): JSX.Element {
  return (
    <WagmiProvider config={WAGMI_CONFIG}>
      <QueryClientProvider client={client}>
        <RainbowKitProvider initialChain={soneiumMinato}>
          {children}
        </RainbowKitProvider>
      </QueryClientProvider>
    </WagmiProvider>
  );
}
In RainbowKitProvider, you can set the initialChain to control which blockchain your dApp connects to first, making it easier for users to interact with the right network if your dApp supports multiple chains.
<RainbowKitProvider initialChain={soneiumMinato}>
  {children}
</RainbowKitProvider>
Step 5: Add the Connect Button in the Header
We are going to create a header file with containing the ConnectButton component. RainbowKit will now handle your user's wallet selection, display wallet/transaction information and handle network/wallet switching.
We’ll create a header component featuring the ConnectButton from RainbowKit, making it easy for users to connect their wallets and handle network/wallet switching.
- Create
commonfolder undermodulesfolder - Create
componentsfolder inside thecommonfolder - Add
Header.tsxandHeader.module.cssfiles under thecomponentsfolder
Folder Structure
📁src
└── 📁app
└── 📁modules
    └── 📁common
        └── 📁components
            └── Header.module.css
            └── Header.tsx
- Header.tsx
- Header.module.css
import { ConnectButton } from "@rainbow-me/rainbowkit";
import styles from "./Header.module.css";

export function Header(): JSX.Element {
  return (
    <header className={styles.wrapper}>
      <ConnectButton />
    </header>
  );
}
.wrapper {
  padding: 0.75rem;
  position: fixed;
  right: 0;
}
With this setup, RainbowKit will manage the wallet selection UI, handle wallet connections.
Step 6: Update the Layout file
Edit layout.tsx to include RainbowKit’s styles and wrap the app with the WalletProvider:
import type { Metadata } from "next";
import { Header } from "@/modules/common/components/Header";
import { WalletProvider } from "@/modules/wagmi/components/WalletProvider";
import "@rainbow-me/rainbowkit/styles.css";
import "./globals.css";

export const metadata: Metadata = {
  title: "WAGMI + RainbowKit Demo App",
  description:
    "A Demo app for minting NFTs on Soneium Minato by using WAGMI and Rainbowkit.",
};

export default function RootLayout({
  children,
}: Readonly<{
  children: React.ReactNode;
}>) {
  return (
    <html lang="en">
      <body>
        <WalletProvider>
          <Header />
          {children}
        </WalletProvider>
      </body>
    </html>
  );
}
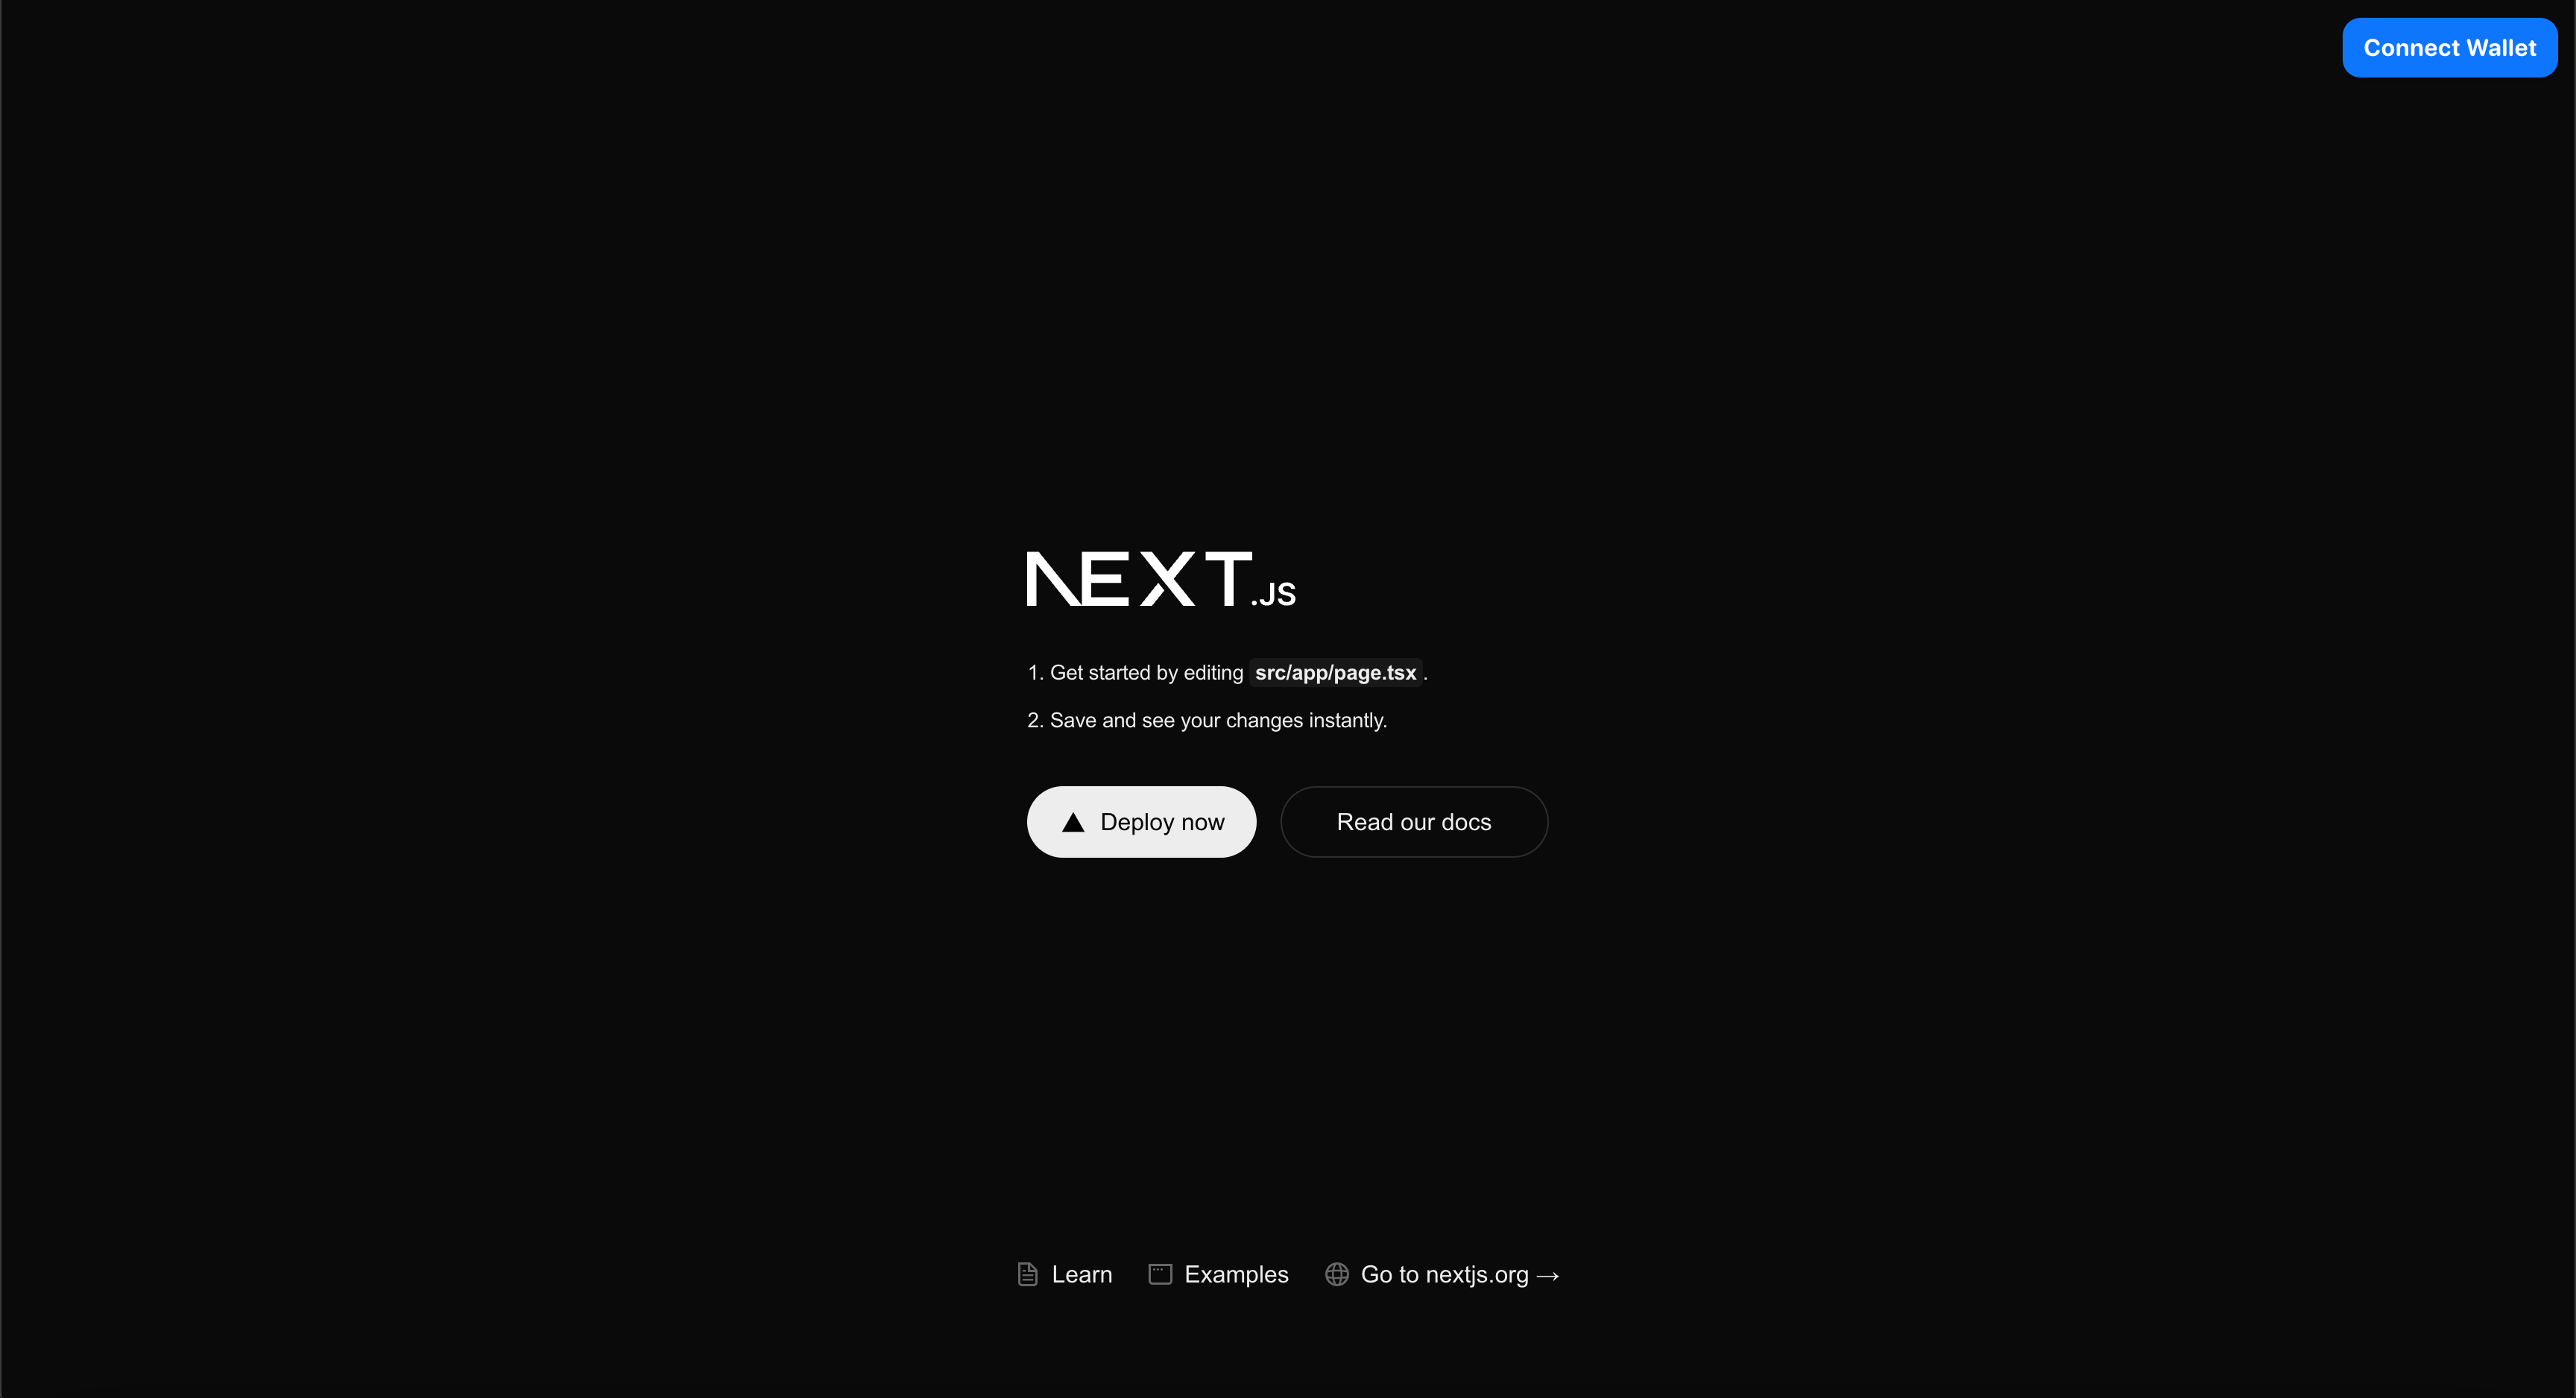
After completing this, your app will look like this:
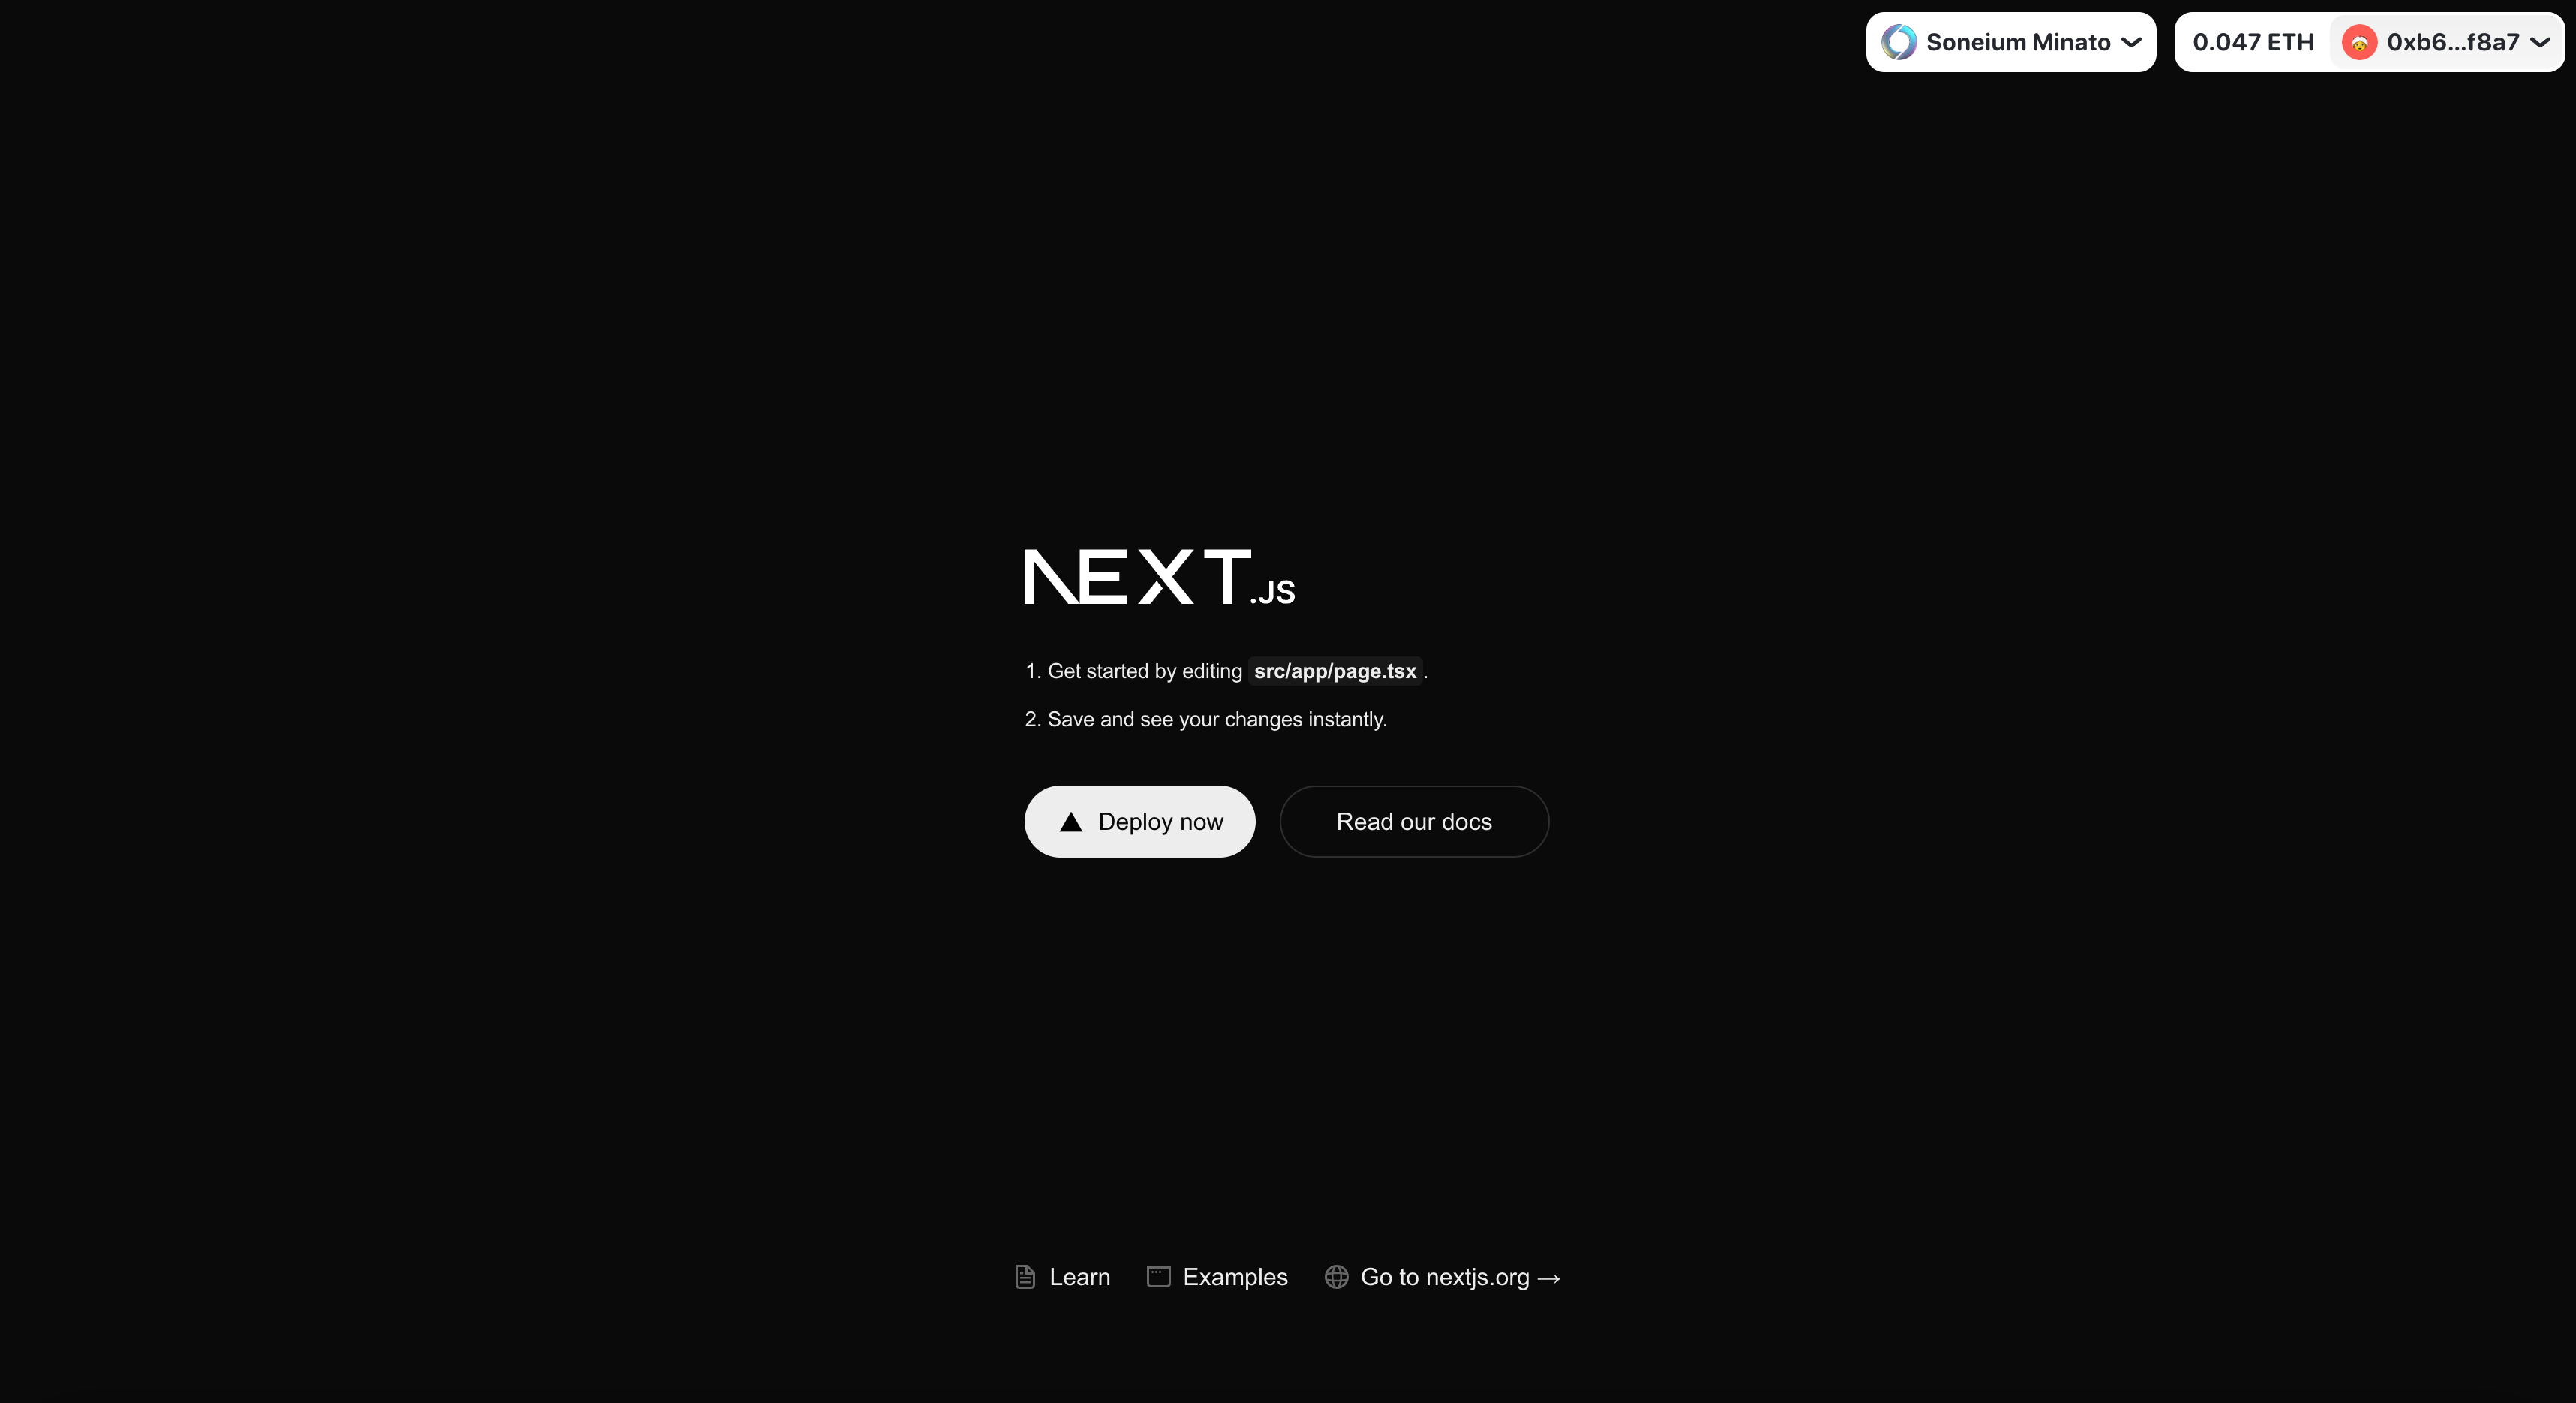
Once a user connects their wallet, the connected chain and account information will appear in the header:
Step 7: Update the Top page and Add the ABI
Now that the app's structure is ready, let's build the main page where users can interact with the NFT smart contract. We'll include logic to mint NFTs, check balances, and display transaction details. Additionally, we'll add the contract's ABI to enable communication with the deployed smart contract.
Adding the ABI
The ABI acts as a bridge between our frontend and the smart contract, defining the methods we can call. Since our contract has been deployed and verified in the previous chapter, you can find the ABI in the Soneium Minato Explorer.
- Create an
abifolder under thewagmifolder. - Add the ABI to a file named
DemoNFT.ts.
Creating the Main Page
Update the page.tsx file to manage user interactions, such as checking their NFT balance and minting new NFTs. Remember to update the nftContractAddress variable with your deployed contract's address.
Folder Structure
📁src
└── 📁app
    └── page.module.css
    └── page.tsx
└── 📁modules
    └── 📁wagmi
        └── 📁abi
            └── DemoNFT.ts
- page.tsx
- page.module.css
- DemoNFT.ts
"use client";

import { useEffect, useState } from "react";
import { type Address } from "viem";
import {
  useAccount,
  useBalance,
  useChainId,
  usePublicClient,
  useReadContract,
  useSwitchChain,
  useWalletClient,
} from "wagmi";
import { soneiumMinato } from "viem/chains";
import NFT_ABI from "../modules/wagmi/abi/DemoNFT";
import styles from "./page.module.css";

// Todo: Update to the correct address for the deployed contract
const nftContractAddress = "0xFd0dA2fC3ac7D18D133b6A87379b80165bF04E14";
const faucetDocs = "https://docs.soneium.org/docs/builders/tools/faucets";

export default function Home(): JSX.Element {
  const [txDetails, setTxDetails] = useState<string>("");
  const { address: walletAddress } = useAccount();

  const { switchChain } = useSwitchChain();
  const connectedId = useChainId();
  const chainId = soneiumMinato.id;
  const isConnectedToMinato = connectedId === soneiumMinato.id;

  const { data: walletClient } = useWalletClient({
    chainId,
    account: walletAddress,
  });

  const publicClient = usePublicClient({
    chainId,
  });

  const [isPending, setIsPending] = useState(false);
  const { data: bal } = useBalance({
    address: walletAddress,
    chainId,
  });
  const isBalanceZero = bal?.value.toString() === "0";

  const { data, isFetched, refetch } = useReadContract({
    abi: NFT_ABI,
    address: nftContractAddress,
    functionName: "balanceOf",
    args: [walletAddress as Address],
  });

  async function mintNft(): Promise<void> {
    if (!walletClient || !publicClient || !walletAddress) return;
    try {
      setIsPending(true);
      setTxDetails("");
      const tx = {
        account: walletAddress as Address,
        address: nftContractAddress as Address,
        abi: NFT_ABI,
        functionName: "safeMint",
        args: [walletAddress],
      } as const;
      const { request } = await publicClient.simulateContract(tx);
      const hash = await walletClient.writeContract(request);
      await publicClient.waitForTransactionReceipt({
        hash,
      });
      setTxDetails(`https://explorer-testnet.soneium.org/tx/${hash}`);
      await refetch();
    } catch (error) {
      console.error(error);
    } finally {
      setIsPending(false);
    }
  }

  function textNftBalances(bal: string): string {
    const balance = Number(bal);
    if (balance > 1) {
      return `You have ${balance} NFTs`;
    } else if (balance === 1) {
      return `You have ${balance} NFT`;
    } else {
      return `You don't own any NFTs yet`;
    }
  }
  useEffect(() => {
    setTxDetails("");
  }, [walletAddress]);

  // Memo: display the page after fetching the NFT balance
  return !isFetched ? (
    <div />
  ) : (
    <div className={styles.container}>
      <div className={styles.rowBalance}>
        {walletAddress && (
          <span>{textNftBalances(data?.toString() || "0")}</span>
        )}
      </div>
      <br />

      <button
        disabled={
          isPending || !walletAddress || isBalanceZero || !isConnectedToMinato
        }
        className={styles.buttonAction}
        onClick={mintNft}
        type="button"
      >
        {isPending ? "Confirming..." : "Mint NFT"}
      </button>

      {txDetails && (
        <div className={styles.txDetails}>
          <span>🎉 Congrats! Your NFT has been minted 🐣 </span>
          <a
            href={txDetails}
            target="_blank"
            rel="noreferrer"
            className={styles.txLink}
          >
            View transaction
          </a>
        </div>
      )}

      {walletAddress && isBalanceZero && (
        <div className={styles.rowChecker}>
          <span className={styles.textError}>
            You don't have enough ETH balance to mint NFT
          </span>
          <a
            href={faucetDocs}
            target="_blank"
            rel="noreferrer"
            className={styles.txLink}
          >
            ETH Faucet
          </a>
        </div>
      )}

      {!isConnectedToMinato && walletAddress && (
        <div className={styles.rowChecker}>
          <span className={styles.textError}>
            Please connect to Soneium Minato
          </span>

          <button
            className={styles.buttonSwitchChain}
            onClick={() => switchChain({ chainId })}
          >
            Switch to Soneium Minato
          </button>
        </div>
      )}
    </div>
  );
}
.container {
  height: 100vh;
  width: 100vw;
  display: flex;
  flex-direction: column;
  justify-content: center;
  align-items: center;
}

.buttonAction {
  background-color: #0085ff;
  padding: 1.5rem;
  border-radius: 16px;
  color: black;
  font-weight: 600;
  color: white;
  border: 0px solid transparent;
  cursor: pointer;
  font-size: 3rem;
  transition: all 0.2s ease-in-out;
}

.buttonAction:disabled {
  cursor: not-allowed;
  opacity: 0.7;
}

.buttonAction:hover {
  transform: scale(1.1);
}

.txDetails {
  margin-top: 2rem;
  font-size: 1.5rem;
  display: flex;
  flex-direction: column;
  justify-content: center;
  align-items: center;
}

.txLink {
  cursor: pointer;
  text-decoration: underline;
}

.rowChecker {
  margin-top: 2rem;
  font-size: 1.5rem;
  display: flex;
  flex-direction: column;
  justify-content: center;
  align-items: center;
  row-gap: 0.5rem;
}

.textError {
  color: red;
  font-size: 1.5rem;
}

.buttonSwitchChain {
  background-color: transparent;
  border: 0px solid transparent;
  font-size: 1.5rem;
  cursor: pointer;
  text-decoration: underline;
}

.rowBalance {
  font-size: 2rem;
}
export default [
  {
    inputs: [
      {
        internalType: "address",
        name: "initialOwner",
        type: "address",
      },
    ],
    stateMutability: "nonpayable",
    type: "constructor",
  },
  {
    inputs: [],
    name: "ERC721EnumerableForbiddenBatchMint",
    type: "error",
  },
  {
    inputs: [
      {
        internalType: "address",
        name: "sender",
        type: "address",
      },
      {
        internalType: "uint256",
        name: "tokenId",
        type: "uint256",
      },
      {
        internalType: "address",
        name: "owner",
        type: "address",
      },
    ],
    name: "ERC721IncorrectOwner",
    type: "error",
  },
  {
    inputs: [
      {
        internalType: "address",
        name: "operator",
        type: "address",
      },
      {
        internalType: "uint256",
        name: "tokenId",
        type: "uint256",
      },
    ],
    name: "ERC721InsufficientApproval",
    type: "error",
  },
  {
    inputs: [
      {
        internalType: "address",
        name: "approver",
        type: "address",
      },
    ],
    name: "ERC721InvalidApprover",
    type: "error",
  },
  {
    inputs: [
      {
        internalType: "address",
        name: "operator",
        type: "address",
      },
    ],
    name: "ERC721InvalidOperator",
    type: "error",
  },
  {
    inputs: [
      {
        internalType: "address",
        name: "owner",
        type: "address",
      },
    ],
    name: "ERC721InvalidOwner",
    type: "error",
  },
  {
    inputs: [
      {
        internalType: "address",
        name: "receiver",
        type: "address",
      },
    ],
    name: "ERC721InvalidReceiver",
    type: "error",
  },
  {
    inputs: [
      {
        internalType: "address",
        name: "sender",
        type: "address",
      },
    ],
    name: "ERC721InvalidSender",
    type: "error",
  },
  {
    inputs: [
      {
        internalType: "uint256",
        name: "tokenId",
        type: "uint256",
      },
    ],
    name: "ERC721NonexistentToken",
    type: "error",
  },
  {
    inputs: [
      {
        internalType: "address",
        name: "owner",
        type: "address",
      },
      {
        internalType: "uint256",
        name: "index",
        type: "uint256",
      },
    ],
    name: "ERC721OutOfBoundsIndex",
    type: "error",
  },
  {
    inputs: [
      {
        internalType: "address",
        name: "owner",
        type: "address",
      },
    ],
    name: "OwnableInvalidOwner",
    type: "error",
  },
  {
    inputs: [
      {
        internalType: "address",
        name: "account",
        type: "address",
      },
    ],
    name: "OwnableUnauthorizedAccount",
    type: "error",
  },
  {
    anonymous: false,
    inputs: [
      {
        indexed: true,
        internalType: "address",
        name: "owner",
        type: "address",
      },
      {
        indexed: true,
        internalType: "address",
        name: "approved",
        type: "address",
      },
      {
        indexed: true,
        internalType: "uint256",
        name: "tokenId",
        type: "uint256",
      },
    ],
    name: "Approval",
    type: "event",
  },
  {
    anonymous: false,
    inputs: [
      {
        indexed: true,
        internalType: "address",
        name: "owner",
        type: "address",
      },
      {
        indexed: true,
        internalType: "address",
        name: "operator",
        type: "address",
      },
      {
        indexed: false,
        internalType: "bool",
        name: "approved",
        type: "bool",
      },
    ],
    name: "ApprovalForAll",
    type: "event",
  },
  {
    anonymous: false,
    inputs: [
      {
        indexed: true,
        internalType: "address",
        name: "previousOwner",
        type: "address",
      },
      {
        indexed: true,
        internalType: "address",
        name: "newOwner",
        type: "address",
      },
    ],
    name: "OwnershipTransferred",
    type: "event",
  },
  {
    anonymous: false,
    inputs: [
      {
        indexed: true,
        internalType: "address",
        name: "from",
        type: "address",
      },
      {
        indexed: true,
        internalType: "address",
        name: "to",
        type: "address",
      },
      {
        indexed: true,
        internalType: "uint256",
        name: "tokenId",
        type: "uint256",
      },
    ],
    name: "Transfer",
    type: "event",
  },
  {
    inputs: [
      {
        internalType: "address",
        name: "to",
        type: "address",
      },
      {
        internalType: "uint256",
        name: "tokenId",
        type: "uint256",
      },
    ],
    name: "approve",
    outputs: [],
    stateMutability: "nonpayable",
    type: "function",
  },
  {
    inputs: [
      {
        internalType: "address",
        name: "owner",
        type: "address",
      },
    ],
    name: "balanceOf",
    outputs: [
      {
        internalType: "uint256",
        name: "",
        type: "uint256",
      },
    ],
    stateMutability: "view",
    type: "function",
  },
  {
    inputs: [
      {
        internalType: "uint256",
        name: "tokenId",
        type: "uint256",
      },
    ],
    name: "getApproved",
    outputs: [
      {
        internalType: "address",
        name: "",
        type: "address",
      },
    ],
    stateMutability: "view",
    type: "function",
  },
  {
    inputs: [
      {
        internalType: "address",
        name: "owner",
        type: "address",
      },
      {
        internalType: "address",
        name: "operator",
        type: "address",
      },
    ],
    name: "isApprovedForAll",
    outputs: [
      {
        internalType: "bool",
        name: "",
        type: "bool",
      },
    ],
    stateMutability: "view",
    type: "function",
  },
  {
    inputs: [],
    name: "name",
    outputs: [
      {
        internalType: "string",
        name: "",
        type: "string",
      },
    ],
    stateMutability: "view",
    type: "function",
  },
  {
    inputs: [],
    name: "owner",
    outputs: [
      {
        internalType: "address",
        name: "",
        type: "address",
      },
    ],
    stateMutability: "view",
    type: "function",
  },
  {
    inputs: [
      {
        internalType: "uint256",
        name: "tokenId",
        type: "uint256",
      },
    ],
    name: "ownerOf",
    outputs: [
      {
        internalType: "address",
        name: "",
        type: "address",
      },
    ],
    stateMutability: "view",
    type: "function",
  },
  {
    inputs: [],
    name: "renounceOwnership",
    outputs: [],
    stateMutability: "nonpayable",
    type: "function",
  },
  {
    inputs: [
      {
        internalType: "address",
        name: "to",
        type: "address",
      },
    ],
    name: "safeMint",
    outputs: [],
    stateMutability: "nonpayable",
    type: "function",
  },
  {
    inputs: [
      {
        internalType: "address",
        name: "from",
        type: "address",
      },
      {
        internalType: "address",
        name: "to",
        type: "address",
      },
      {
        internalType: "uint256",
        name: "tokenId",
        type: "uint256",
      },
    ],
    name: "safeTransferFrom",
    outputs: [],
    stateMutability: "nonpayable",
    type: "function",
  },
  {
    inputs: [
      {
        internalType: "address",
        name: "from",
        type: "address",
      },
      {
        internalType: "address",
        name: "to",
        type: "address",
      },
      {
        internalType: "uint256",
        name: "tokenId",
        type: "uint256",
      },
      {
        internalType: "bytes",
        name: "data",
        type: "bytes",
      },
    ],
    name: "safeTransferFrom",
    outputs: [],
    stateMutability: "nonpayable",
    type: "function",
  },
  {
    inputs: [
      {
        internalType: "address",
        name: "operator",
        type: "address",
      },
      {
        internalType: "bool",
        name: "approved",
        type: "bool",
      },
    ],
    name: "setApprovalForAll",
    outputs: [],
    stateMutability: "nonpayable",
    type: "function",
  },
  {
    inputs: [
      {
        internalType: "bytes4",
        name: "interfaceId",
        type: "bytes4",
      },
    ],
    name: "supportsInterface",
    outputs: [
      {
        internalType: "bool",
        name: "",
        type: "bool",
      },
    ],
    stateMutability: "view",
    type: "function",
  },
  {
    inputs: [],
    name: "symbol",
    outputs: [
      {
        internalType: "string",
        name: "",
        type: "string",
      },
    ],
    stateMutability: "view",
    type: "function",
  },
  {
    inputs: [
      {
        internalType: "uint256",
        name: "index",
        type: "uint256",
      },
    ],
    name: "tokenByIndex",
    outputs: [
      {
        internalType: "uint256",
        name: "",
        type: "uint256",
      },
    ],
    stateMutability: "view",
    type: "function",
  },
  {
    inputs: [
      {
        internalType: "address",
        name: "owner",
        type: "address",
      },
      {
        internalType: "uint256",
        name: "index",
        type: "uint256",
      },
    ],
    name: "tokenOfOwnerByIndex",
    outputs: [
      {
        internalType: "uint256",
        name: "",
        type: "uint256",
      },
    ],
    stateMutability: "view",
    type: "function",
  },
  {
    inputs: [
      {
        internalType: "uint256",
        name: "tokenId",
        type: "uint256",
      },
    ],
    name: "tokenURI",
    outputs: [
      {
        internalType: "string",
        name: "",
        type: "string",
      },
    ],
    stateMutability: "view",
    type: "function",
  },
  {
    inputs: [],
    name: "totalSupply",
    outputs: [
      {
        internalType: "uint256",
        name: "",
        type: "uint256",
      },
    ],
    stateMutability: "view",
    type: "function",
  },
  {
    inputs: [
      {
        internalType: "address",
        name: "from",
        type: "address",
      },
      {
        internalType: "address",
        name: "to",
        type: "address",
      },
      {
        internalType: "uint256",
        name: "tokenId",
        type: "uint256",
      },
    ],
    name: "transferFrom",
    outputs: [],
    stateMutability: "nonpayable",
    type: "function",
  },
  {
    inputs: [
      {
        internalType: "address",
        name: "newOwner",
        type: "address",
      },
    ],
    name: "transferOwnership",
    outputs: [],
    stateMutability: "nonpayable",
    type: "function",
  },
] as const;
Test Out the App
With everything set up, it's time to test your dApp! This dApp allows users to connect their wallets, mint NFTs, and view their NFT balance directly from the interface. Users can see a list of their NFTs in the explorer (Example) and interact with Soneium Minato blockchain seamlessly.
Before Minting
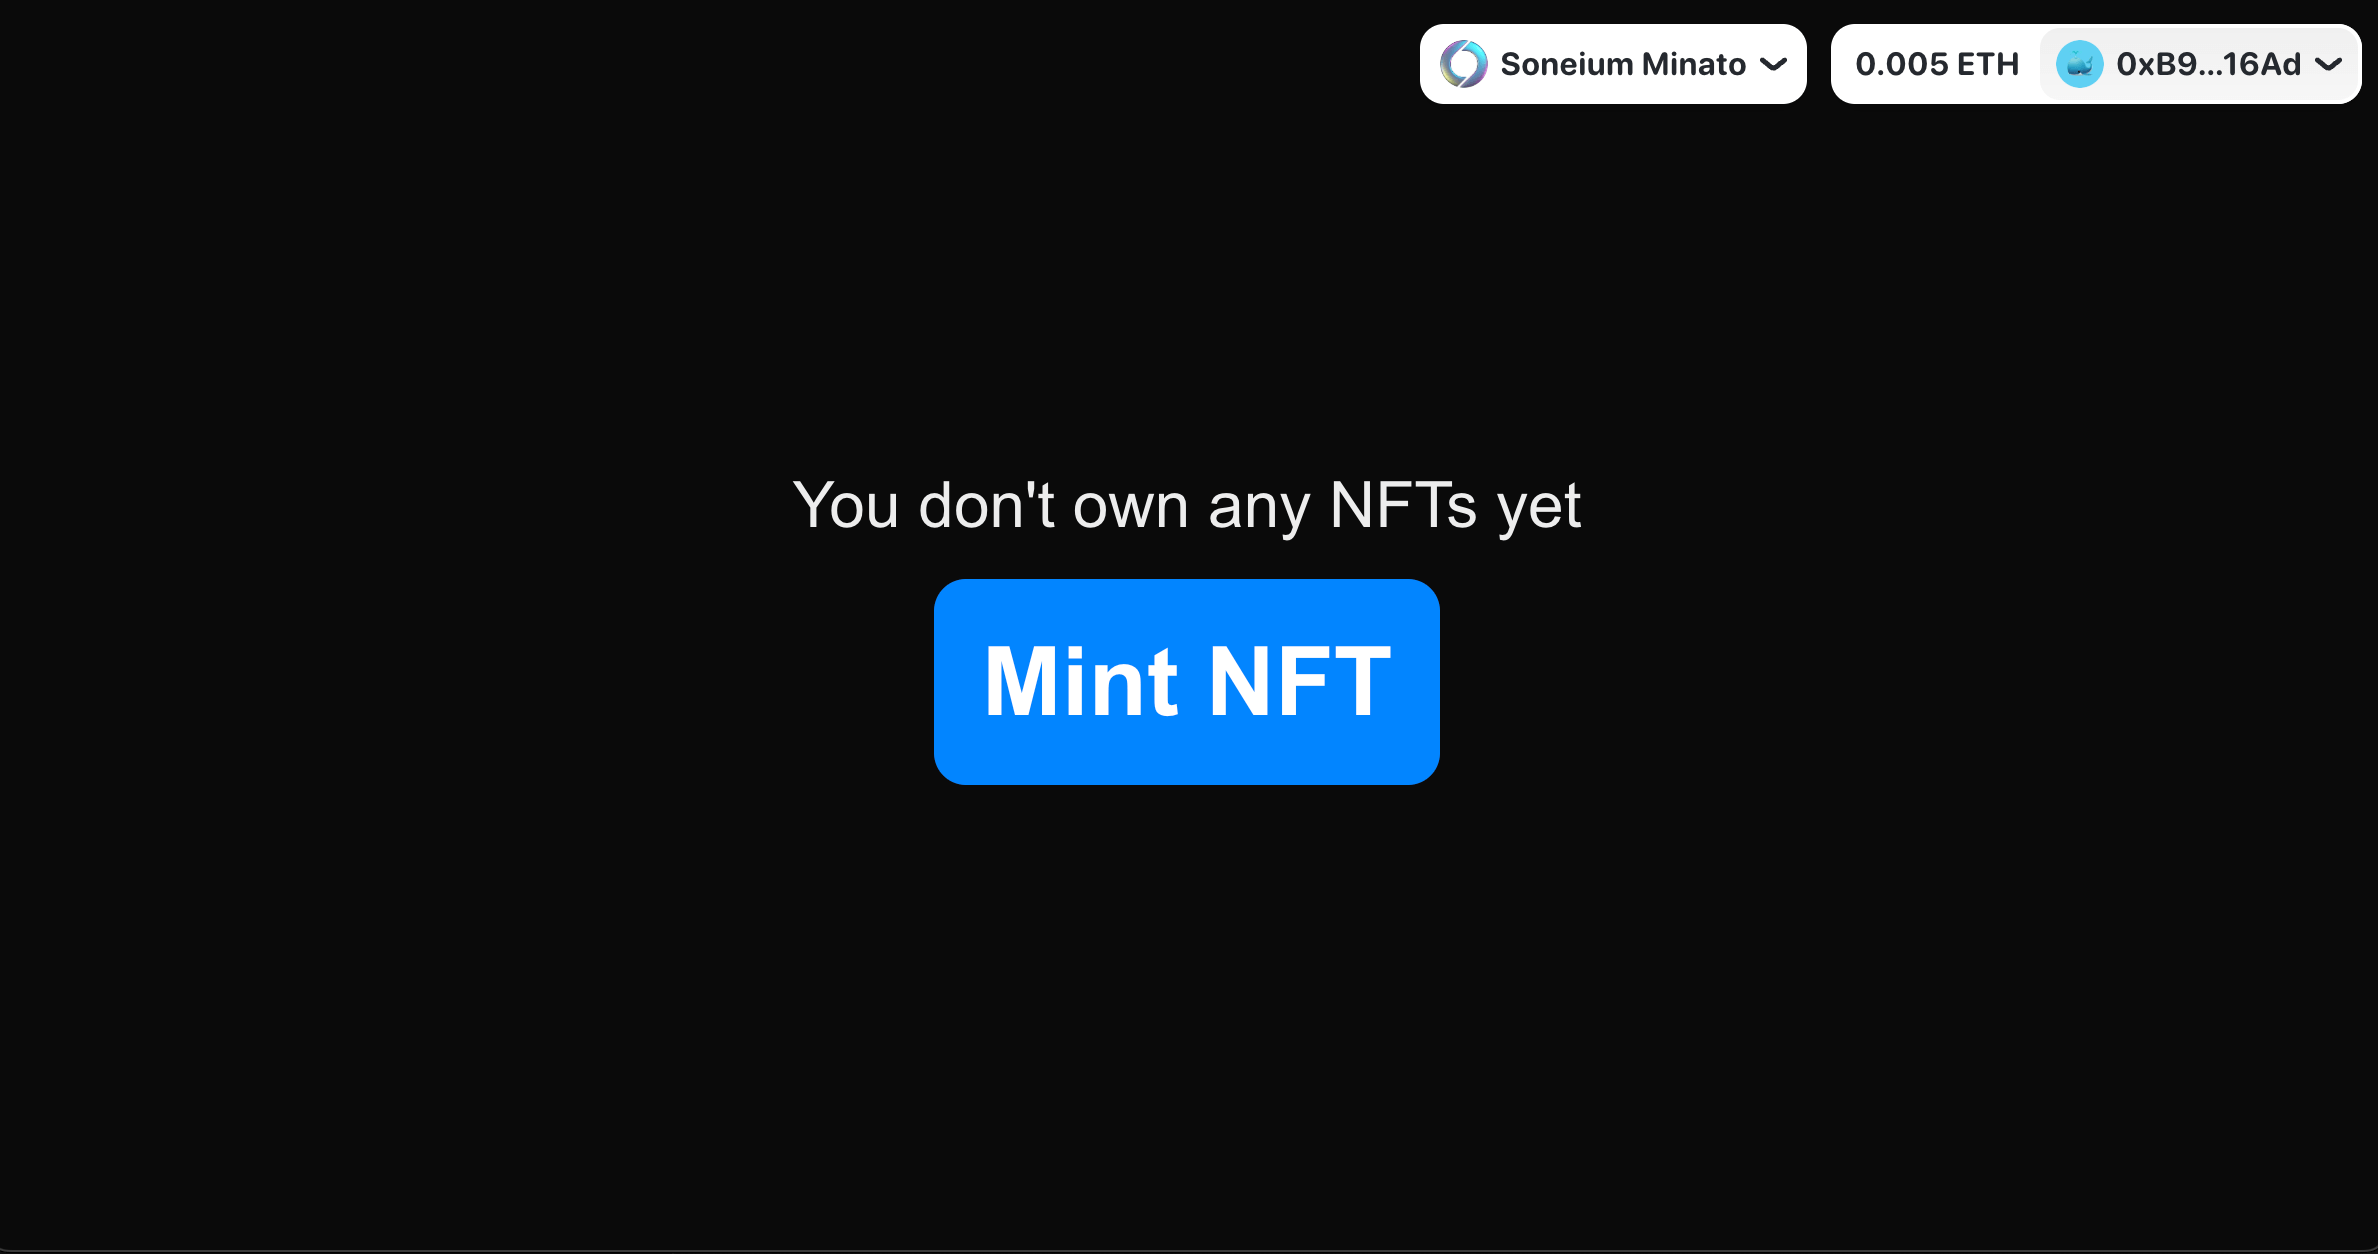
When users first connect, they can see their current NFT balance:
During the Minting Process
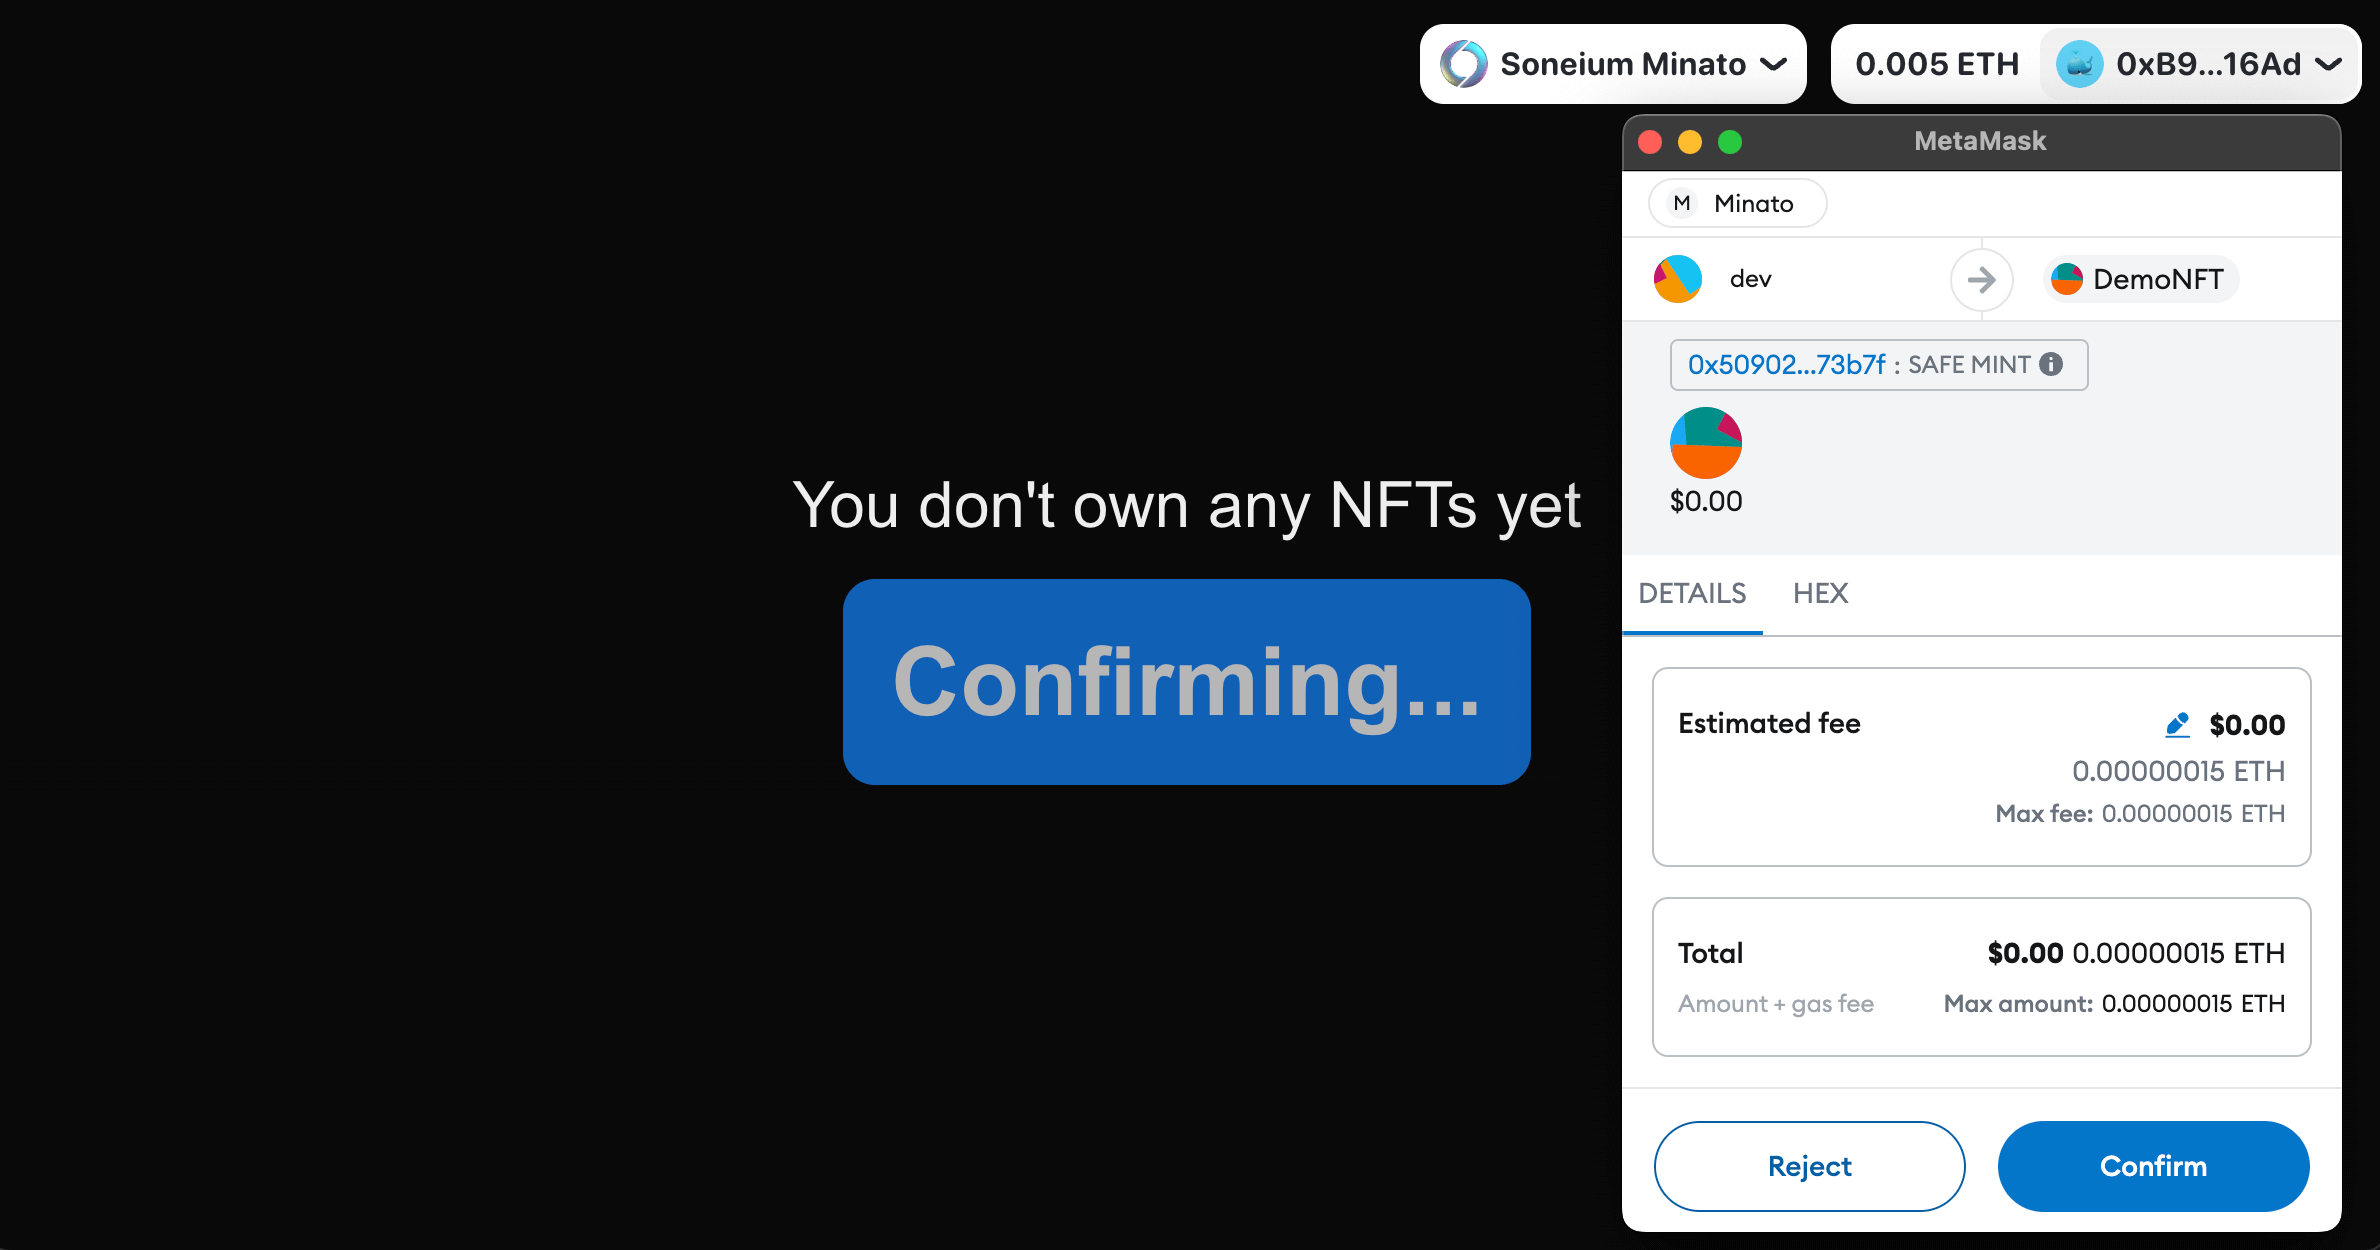
While a minting transaction is in progress, the button will indicate that it’s processing, and the user can track the transaction status:
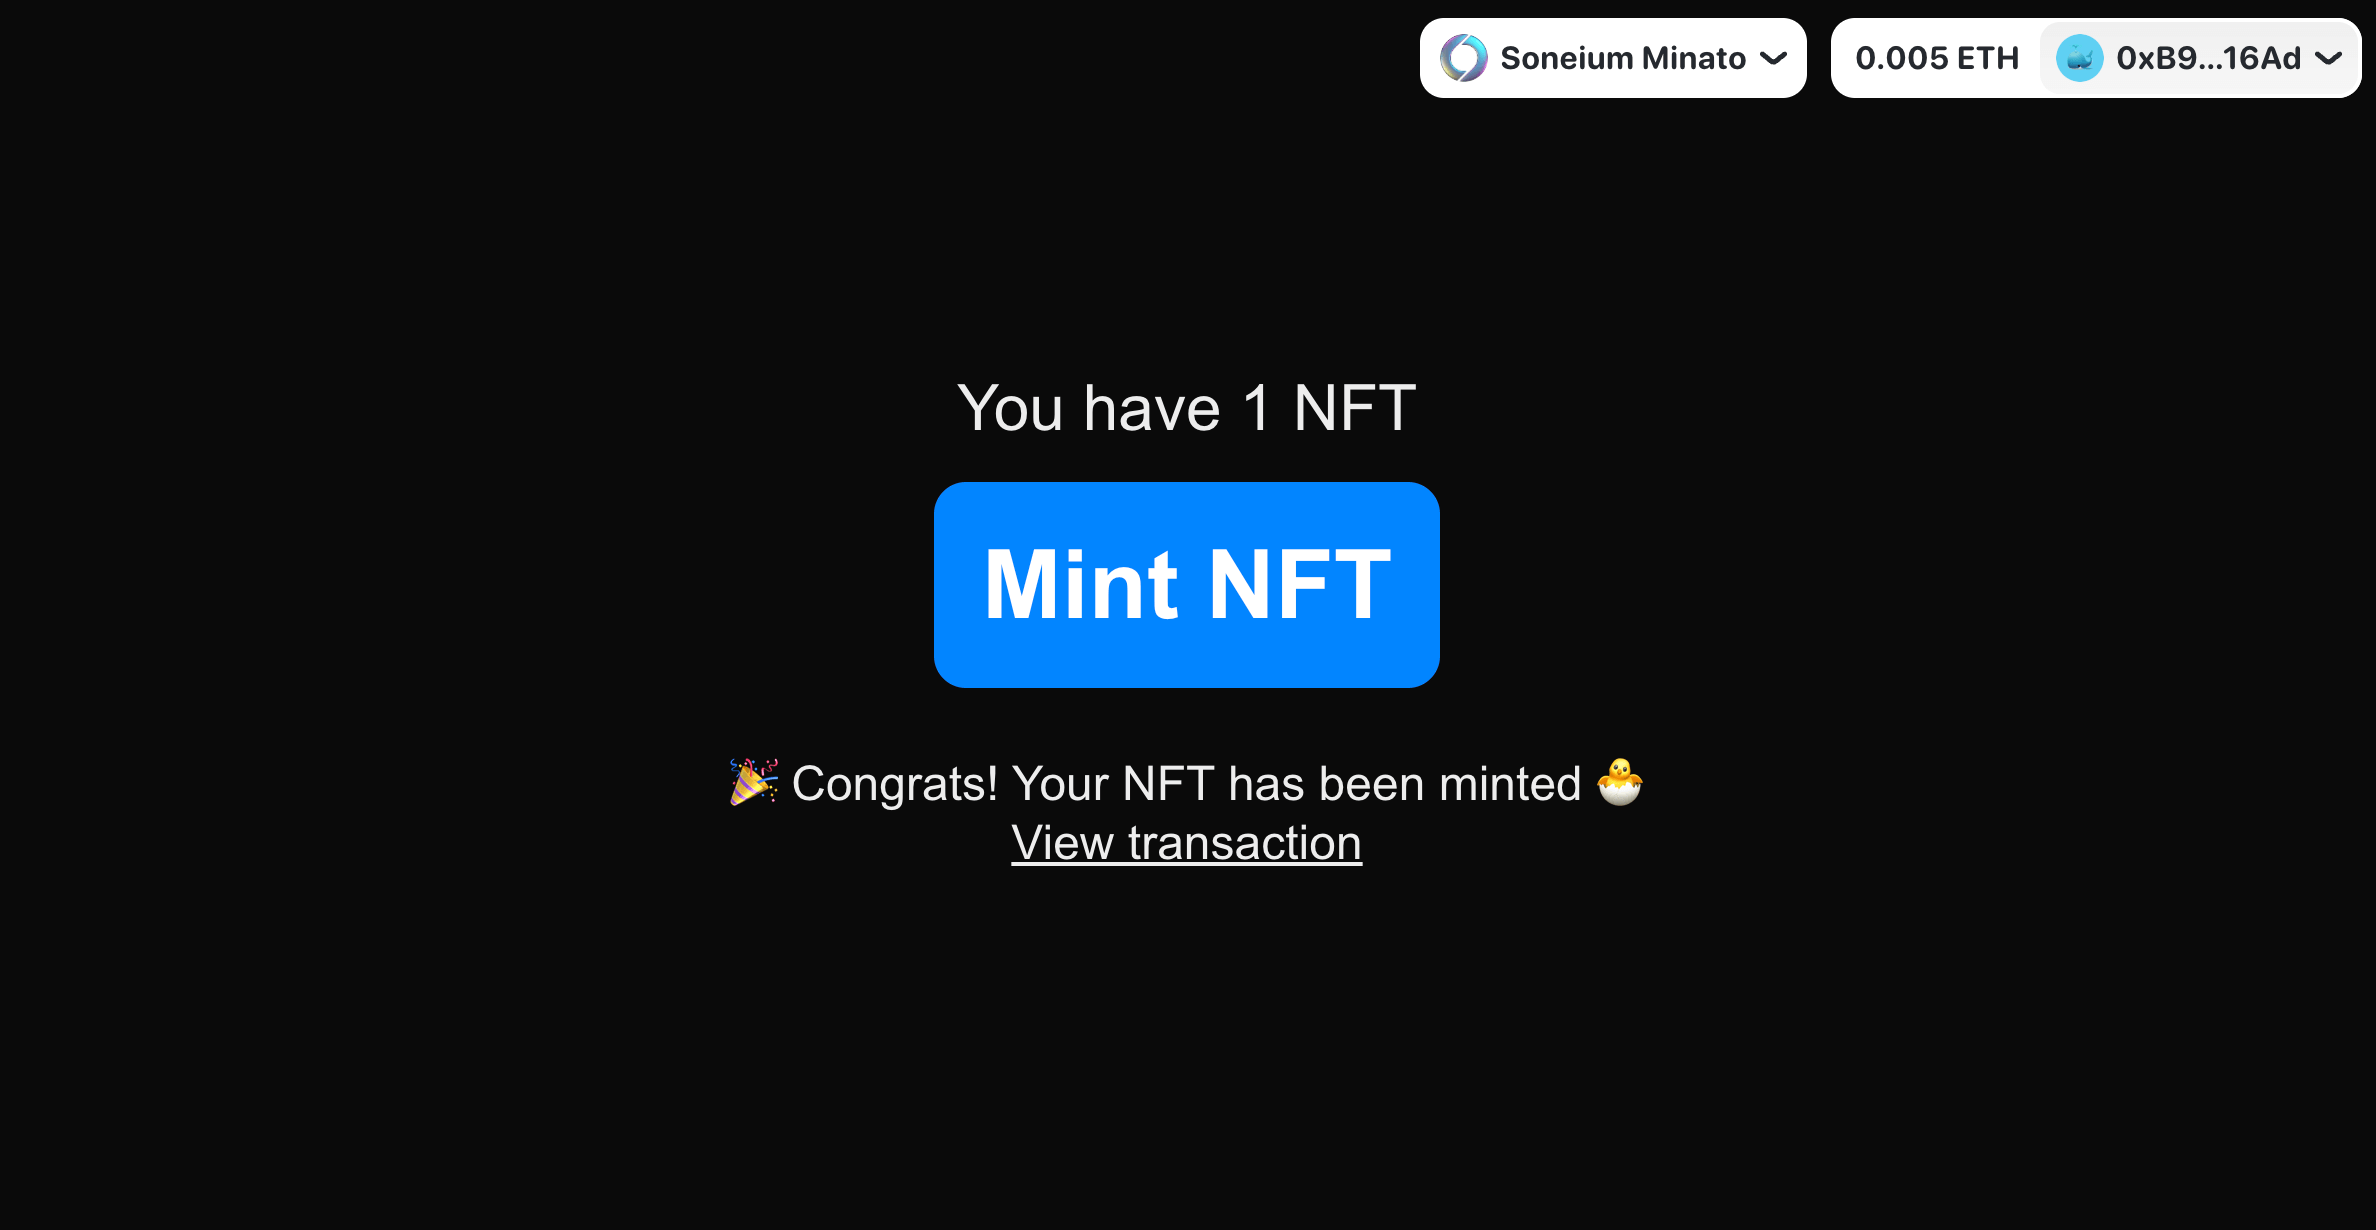
After Minting
Once minting is complete, a success message and a link to view the transaction on the Soneium Minato Explorer will be displayed:
Congratulations! 🎉
You’ve successfully built a fully functional NFT dApp on Soneium Minato using Next.js, WAGMI, and RainbowKit! The app can now seamlessly interact with the blockchain, mint NFTs, and explore their transactions.
Now that you have this foundation, the next step is to expand and customize your dApp. Whether you want to add more functionality, refine the user interface, or support additional chains, the possibilities are endless.
Happy building! 🚀